Showing posts with label PS Elements. Show all posts

Tuesday, September 25, 2007

Back to School Time for Creative Genealogists!

September is here and it's back to school time! Adobe is offering 3 new classes that will be of interest to digital scrapbookers. There are two classes featuring the newly announced Adobe Elements 6.0, and one for advanced scrapbookers using Photoshop CS3.

  • What's New in Photoshop Elements 6.0 will be offered on 10/02/2007
  • Tell your story with photos and videos using Photoshop Elements 6 and Premiere Elements 4 will be offered on 10/23/2007
  • Advanced Scrapbooking with Photoshop CS3 will be offered on 11/13/2007
To register (for free) click here. You must register on the Adobe.com site to register for classes.

Right after you register for classes, you need to go shopping for back-to-school supplies ;-) Here's what you need boys and girls...

Adobe Photoshop Elements 6 ($89.99 ... a 10% discount plus free shipping!)

Adobe Photoshop Elements 6/Adobe Premiere Elements 4 (a bundle of both software programs for $139.99 which is $10.00 off the regular price and $40 less than buying the two programs separately, plus free shipping!!!)

Adobe Photoshop CS3 ($629.49) Adobe Photoshop CS3 Upgrade ($195.99) Free shipping on either!

Photoshop Elements 6.0 will be shipping October 5th for Windows XP/Vista users, so get your order in now! Mac users, your version will be coming out after the first of next year. Photoshop CS3 is already available!

If you purchase your software using the links on this site you will be supporting my genealogy blogging and not-for-profit genealogy web sites. Thank you for considering purchasing from Amazon.com through my links :-D

Now go get creative with your genealogy!

Wednesday, August 29, 2007

For Photos With That Vintage Look From The 1940s

If you've got some old photos from the 1940s, you've probably got one or two with deckled edges. I don't know if deckled edges on photos was a style unique to the 1940s or not but all the photos I have with deckled edges happen to be from the 1940s.

Anyway... that deckled edge adds a nice vintage look to photos. If you'd like to add the deckled edge to some of your photos you'll be happy to know that you can do it in Photoshop Elements 5.0. Linda Sattgast has a quick and easy tutorial in this week's edition of her weekly newsletter. If you'd like to check it out you can do so on her digi scrapping site. It's her tip of the week this week. If you're reading this after the week of August 27, 2007, try here.

If you give this tutorial a try and you like the results you might want to enter your results in a Challenge on the forum at Linda's site. If you do, let me know. I wanna see!

Now go get creative with your genealogy!

Friday, August 24, 2007

How to Create a Good Looking Scrapbook Page Using a Poor Quality Photo

Sometimes no matter how long you work on editing a photo you can't make it look good. It's the old, "you can't make a silk purse out of a sow's ear", story. This is often the case with photos taken back in the 1960s and 1970s. Remember those Kodak Instamatic cameras that used 110 cartridge film? Many of us have a slew of poor quality photos taken with those once popular models.

Here is a picture of me taken in 1972 with a Kodak Instamatic camera using color slide film. You just can't make this photo sharp and crisp.

I can't go back and retake the photos of my teenage years. I'm stuck with the photos I have, poor quality though they may be. The photos are still precious to me because of the memories attached to them. So I'd still like to create a scrapbook page to capture the essence of those days. But what can I do about that poor quality photo?

The best thing I've found to do when scrapping with a poor quality photo is to only use a small portion of it (enough to jog the memory) and surround it with elements that will pull your eye away from the photo. Bright colors and or a busy layout will direct your eye around the page rather than focus on just the picture.

In the layout shown below, I used the "cookie cutter" tool in Adobe Photoshop Elements 5.0 on my photo and "cut" it into a flower shape. Once the photo was cut out I layered it with two other flower elements to draw the eye out from the photo. When you have a great photo, you want your scrapbook page to emphasize it and set it off. But when you have a poor quality photo you may want to consider de-emphasizing it.


When you first look at this page your eye is naturally drawn to the photo. But it doesn't stay there. It's pulled away first to the bright orange flower that frames it and then further out to the peace sign, up the green ribbon to the bright yellow smiley flower, and then to the text areas.

So there you have it. A way to make a scrapbook page look good even with a poor quality photo. No excuses now... get busy and get creative with your genealogy!

[Scrapbook kit used: Hippy Chic by CanDesigns]

Sunday, July 29, 2007

Family Walkin' Shirts

The Alzheimer's Association Memory Walk® events are coming up in the next few weeks. If you plan to participate in a walk to support this cause that is (or should be) very near and dear to the heart of every family historian, you'll want to wear team (family) t-shirts. I know you think this may sound corny but believe me you'll feel like the poor relation if you/your team shows up for the walk without them. For some (families), it's about remembering their loved one who's suffered from this dreaded disease. For others (businesses or organizations), it's about joining together to support the community and/or the Alzheimer's Association. Regardless of why you participate in the walk you'll look ever so much more "with it" if you and yours have a t-shirt to wear. It's sort of a badge of pride so to speak.

Creating a custom t-shirt is really easy to do. Let's look at the simple steps involved...


  • Register for the Memory Walk event near you. Once you do you'll be given contact information for a coordinator near you.

  • Call or email your local coordinator and ask them to send you the Memory Walk logo art. These are JPG files easily sent by email.

  • For a family t-shirt, pull up one or more of your favorite family photos in your photo editing program of choice (I recommend Adobe Photoshop Elements 5.0 ), add the name of your loved one or your family, add the Memory Walk logo, and save your file.

  • For a business or organization team t-shirt, get a copy of your company or organization's logo and open it in your photo editing software, add a snappy saying like "Boy Scout Troop 123 is taking steps to end Alzheimer's Disease" along with the Memory Walk logo and save the file.

  • Go to CafePress.com. Click on "Make Your Own Stuff" and follow the simple steps to create your t-shirts. Then you can order them for all of your family or save the artwork in your own (free) store for the members of your business or organization to order up themselves.
It's just that easy! But you should get started on the project now because you know how things have a tendency to go wonky when you're right up against a deadline ;-)

And here's a bit of sage advice for you, be careful about copyright infringement. I created a piece of artwork loosely based on the I Love Lucy TV show (my mom's name was Lucy). I'll show it here as an example of what not to do. Now personally, I didn't think it was all that similar to the show's logo but I guess I'm a better graphic artist than I thought ;-) The folks at CafePress refused the order on the basis of possible copyright infringement.
So I had to alter the artwork a bit and the shirts ended up looking like this.


I'll be walking in the Memory Walk in my area on August 25th along with several of my family members. We're supporting the cause and I encourage you to get involved also. If you'd like to read why I'm supporting the cause you can do so here. If you don't want to walk yourself or can't, consider sponsoring a walker. We'd appreciate your support!

Get creative with your genealogy and support a worthwhile cause while you're at it!

Sunday, July 22, 2007

Digital Scrapbooking, Anyone Can Do It!

When genealogy is your primary hobby, you generally don't have much time left over for other endeavors. That's just the kind of hobby genealogy is... time consuming and addictive. So I realize that introducing the idea of digital scrapbooking (another hobby that can be time consuming and addictive) to my fellow genealogists is bound to get a tepid reception. You may like the results of sample scrapbook pages you've seen but you don't think you have time to start creating pages of your own. I know just what you mean! Really. You probably think you don't have enough creative ability to make up the pretty pages with all the fancy doo-dads either. Here's my confession... I've had those thoughts too. But you can put together pages that look great in a very short period of time. And I'm going to tell you how.

Introducing... QPs! (aka Quick Pages). The digital scrapbooking folks have made it so easy for us by not only creating kits with color and design coordinated papers and elements/embellishments, they've even taken those papers and elements and put them together in ready-to-use pages! Is that cool, or what? I'm not kidding here. The pages are all designed (and look terrific!) and ready to use. All you have to do is add your photo and your personal journaling (an expanded caption) and you've got one dynamite page! Take a look at this one...

Now you can't tell me that isn't a page to be proud of. Come on admit it, it's gorgeous! I'd love to claim the credit for it but I didn't create any of it. This quick page was created by "Olga 9999" using a kit called Eastern Spice which was designed by the very talented Julie Olree, of the Stone Accents blog. Now here's the thing. It's a free download just the way you see it except that it doesn't come with a photo (you have to supply your own) and the note card's lines are blank... just waiting for you to write on them. All you have to do is download the file (which you can find here), un-"zip" it (it's a PNG file), and open it in PSE or Photoshop. Then you import the photo you want to use and drop it to a layer beneath the quick page layer. Align the photo as you like in the transparent "window" of the quick page, type the information you'd like to add on a layer above the quick page and you're done. Yep. That's it. That's all there is to it!

But wait, it gets even better... Julie has a whole gallery of quick pages and they are all free to download! I know. Sounds too good to be true doesn't it? But I'm not kidding you. You do need to register on the site (but she doesn't ask for personal info) and good manners demand that you thank the quick page creator with a comment and give credit to all parites concerned if you post your page on the web. But that's quite a bargain, don't you think?

There are several other sites out there that also offer completely designed quick pages. I'll be mentioning some of them to you in future posts.

If you haven't bought Adobe Photoshop Elements 5.0 yet, what are you waiting for? Get it now and start amazing your friends and family with terrific scrapbook pages. Get creative with your genealogy!

Thursday, July 5, 2007

Free Digital Scrapbooking Webinar

Linda Sattgast is having an eSeminar sponsored by Adobe on July 10, 2007 on scrapbooking with Adobe Photoshop Elements 5.0. The demonstrations will be geared to beginner through intermmediate scrapbookers. This webinar will begin at 9:00 a.m. Pacific Daylight Time and will last about an hour. It's free, but you have to register in advance. You can do so here. The Adobe webinars tend to fill up quickly so I wouldn't wait too long to register for this one. Linda Sattgast is a talented teacher and knows Photoshop Elements inside and out. If you've been thinking about getting started with digital scrapbooking or you've already tried it and want to learn more, this webinar will be worth your while to attend. I'm already registered. Won't you join me?

Get a great price on Adobe Photoshop Elements 5.0


Wednesday, June 6, 2007

How To Create a Silhouette and Use it in Family History Projects

One very easy way to capture an image of a person and reuse it in a million different ways is to create a silhouette. I'll demonstrate, creating a Father's Day tribute scrapbook page. For those who are not familiar with silhouette as an art form, here is a definition from Wikipedia.

A silhouette is a form of artwork. It is most commonly a human portrait in profile, in black. They do not show any facial expression. Silhouettes are most often made by a skilled silhouette artist by looking at a subject's profile, whether in person or from a photograph, and simply cutting out their likeness freehand.

Two hundred years ago, long before the camera was invented, someone wishing to have an inexpensive portrait created of their loved ones would have visited a silhouette artist. Within minutes and using only a pair of scissors and a skillful eye, he wood have produced a little njh with a remarkable resemblance to his subject.

In America, Silhouettes were highly popular from about 1790 to 1840. The invention of the camera signaled the end of the Silhouette as a widespread form of portraiture. However, their popularity is being reborn in a new generation of people who appreciate the Silhouette as a nostalgic and unique way of capturing a loved one's image.

A silhouette is very versatile. Once you have created one, you can save it and reuse it again and again. The style has a place in history, as noted above, and is very appropriate in vintage albums. If used in the traditional black on white combination it makes a very strong statement. It can also be toned down in sepia tone or any monotone combination.

Silhouettes are fairly easy to create. You can start with any photograph of a person in profile and use the selection brush (in Photoshop Elements) to create an outline of the person(s) of interest. The key is to take your time and get a good, detailed outline. The details are what will make your person recognizable. Then create a new layer and fill the selected area with black. Then insert a new solid white layer behind it and you're done! That's all there is to it. I would recommend saving the selection so that you can use it again in the future as well as saving the file of course.

If you don't have a photo of a person in profile but you have a straight-on view that you want to use I would suggest you check out Easy Two Tone Silhouette from photoshopLab. This particular set of instructions is for Photoshop users but it works essentially the same way in PSE. It will still give you a great silhouette to use in your family history projects.

Once you have the silhouette created you can use it in all sorts of ways... on a greeting card, on a business card, as an element on a digital scrapbook page, framed as a wall portrait, as a cover design for a family history book, or even printed on a t-shirt.

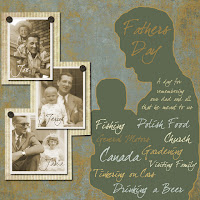
Here's an example of how I took a silhouette project from my initial photograph to a completed scrapbook-page-tribute to my dad for Father's Day. The entire project took me just under 3 hours and I used a digital scrapbook kit called Remembering Father by Jeanine Baechtold (the kit that came with my June Premiere issue from ScrappersGuide.com).

Here's the photo I started with. It's a photo of my dad holding my oldest brother, 1945. We have a precious few photos of my dad so I wanted to create a silhouette eliminating the detail of my brother's face. That way I could use the silhouette in a variety of ways for any of us kids. The silhouette will show my dad's profile with enough detail to recognize him but my brother will come out as a generic baby. It could be any of us kids my dad is holding so I can use the silhouette on any piece of family artwork.

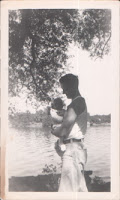
Next, I cropped the photo for a more close-up view and upped the contrast a bit so I could see the edges in the image better. As you can see, it's not an especially good photo in terms of the lighting or contrast. But that doesn't matter.

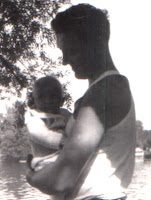
This is where I used the selection brush to create an outline of my dad and brother and fill it with black. The result is this.

From here, I started a new file and chose a background paper to start with. Then I copied and pasted the silhouette layer from the first image to a new layer on top of the background paper. (You may have to play around with the size and scale if necessary.) Next I picked a color from the background paper and used the paint bucket to change the color of the silhouette. Then I added an outline around the silhouette to set it off from the background. From there I built the rest of the page using 3 family photos (one for each of us kids with dad) and some additional paper and elements from the kit. I finished by adding a few words that I think of when I think of my dad and I'm done. The finished piece is a 12"x12" digital scrapbook page but it could also have been a greeting card, t-shirt, or framed artwork. The photos pop out at you but the silhouette and background add a softer, nurturing, and more contemplative tone to the piece reflecting the hazy memories of dad that we share (he died 33 years ago).

This is just one example of how you can use a silhouette of an ancestor. What other ideas do you have for using a silhouette for creative genealogy?

Did you like this post? Submit it to:

Monday, June 4, 2007

How I Learned Digital Scrapbooking Using Photoshop Elements

I received an inquiry about the eyelet lace on the masthead of this blog. It's a brush created in PSE. Isn't it a great design element for just about any vintage scrapbook page?

Here's the scoop on the lace... the brush was created by Linda Sattgast. Linda has a web site called ScrappersGuide.com where she teaches wonderful techniques for digital scrapbooking. She is a master of Photoshop and Elements and she is a natural instructor as well. Linda uses both .pdf's and videos to teach her techniques and they are very easy to learn from. You can subscribe to her free newsletter right from her home page and receive helpful lessons on digital scrapbooking each week. In addition, she has CDs you can purchase with step-by-step lessons for learning all the basics. I have purchased and recommend her Photoshop Elements 5.0 training video. Even for a very experienced Photoshop user like myself it will come in handy. Elements is enough different from Photoshop and scrapbooking is enough different from photo editing to make this CD valuable.

Once you master the basics, you may want to subscribe to Linda's premiere newsletter. It comes out once a month and has more advanced techniques as well as a full kit designed by a professional designer. The kits are terrific! I look forward to getting my new kit each month and I haven't been disappointed yet. Each month also has an instructional video for a new technique and often sample templates, brushes, or layer styles that she created to go with the videos.

Linda's web site also has a forum where you can interact with other scrappers. People share great tips and techniques with each other and also offer some great advice. There's a gallery too where you can post your scrapbook pages and get some feedback on your layout.

Now, getting back to the eyelet lace brush... Linda's video for May for the premiere subscription was on making eyelet lace. Along with the video was the kit Shabby Flora by Michelle Shefveland, and some sample eyelet lace brushes you can load into Elements or Photoshop. The lace I used above is one of her sample brushes. After watching Linda's video I could have made my own but I was pressed for time and the sample brush came in handy. You can purchase past premiere back issues on Linda's web site. The May issue with the tutorial on making an eyelet lace brush is here.

Virtually all of the techniques Linda has taught since I've been a premiere subscriber (October 2006) are ones you would find helpful in creating a heritage scrapbook. Very versatile, very impressive. Scrapbooking is a great way to dress-up your family's photos!

I have not received any compensation from Linda Sattgast, Michelle Shefveland, or Adobe.

Thursday, May 31, 2007

5 Reasons Why Every Genealogist Should Own Photoshop Elements


Why should a genealogist own PSE, aka Elements? What's so special about it?

Adobe Photoshop Elements, once thought of as the baby brother to Adobe Photoshop, is ideally suited for the genealogy hobbiest. Like it's big brother, PSE originally started out as a photo editing program. But from the start it was targeted for the home-hobby user as opposed to photography professionals. Now on version 5.0, PSE has continued to add features for photo editing but has also developed features for digital scrapbooking and creating slide shows and videos as well. You can do many things in PSE with one click that would take you several steps in Photoshop. If you're like me, looking for good results but always pressed for time, you'll appreciate that! And there's more...

Here's 5 reasons why I think every genealogist should own Adobe Photoshop Elements 5.0 :


  1. Photo retouching/editing of family photos and documents. PSE makes photo retouching easy. Let's face it, genealogists accumulate lots of family photos... not all of them in pristine condition. Spots, tears, creases, and fading are all common maladies that PSE has easy-to-use tools to deal with. Could there be a clue you're missing in a faded photograph?

  2. Digital scrapbooking for creating family albums. PSE comes with scrapbook backgrounds, elements, photo frames, and even templates for easily creating scrapbook pages for your family album. What? You don't know why you'd want to create a scrapbook? A future post on that subject will be coming soon, but trust me, you want to do this.

  3. Organizing your photos and documents. PSE comes with a media organizer that is based on tagging your photos or documents with keywords, so finding them is easy. Genealogists not only accumulate family photos of numerous people from different periods of time but then there's all those related vital records and ephemera (.pdf, sound files, videos, and photos). How about this... type in one name and pull up every photo, photo document, and scan document for that person regardless of what file folder they are in on your hard drive. Have I got your attention yet?

  4. Ease of use. PSE is easier to use than Photoshop, but still more robust than say Picasa (another great program I wouldn't be without). There are a variety of tutorials, after-market books, and even podcasts available to give you lots of tips and tricks to minimize the learning curve. (I'll be featuring a few of these here too.) Less time learning software means more time for genealogy research!

  5. Help is everywhere. PSE is designed and engineered by Adobe, the leader in the photo editing/retouching industry. Adobe has forums, blogs, and loads of help files so you can get your questions answered if you get stuck. Lots of add-ons too! Genealogists are used to having all the questions but not all the answers. In this case, you can get your questions answered... that will be a novel experience, eh?
I've used Photoshop for 10+ years (took 3 college level, for-credit classes in it). It's a great program, very "rich" (read that complicated). PSE doesn't do everything Photoshop does but it does do somethings Photoshop doesn't do. Handy things. It's much more efficient to use if you don't need all the whistles and bells... and unless you're a professional photographer you probably don't.

So that's my take on why genealogists should own PSE. What are your thoughts? Do you use it? If not, why not? If so, what features do you like best? Are you using it for digital scrapbooking?