 One very easy way to capture an image of a person and reuse it in a million different ways is to create a silhouette. I'll demonstrate, creating a Father's Day tribute scrapbook page. For those who are not familiar with silhouette as an art form, here is a definition from Wikipedia.
A silhouette is a form of artwork. It is most commonly a human portrait in profile, in black. They do not show any facial expression. Silhouettes are most often made by a skilled silhouette artist by looking at a subject's profile, whether in person or from a photograph, and simply cutting out their likeness freehand.
Two hundred years ago, long before the camera was invented, someone wishing to have an inexpensive portrait created of their loved ones would have visited a silhouette artist. Within minutes and using only a pair of scissors and a skillful eye, he wood have produced a little njh with a remarkable resemblance to his subject.
In America, Silhouettes were highly popular from about 1790 to 1840. The invention of the camera signaled the end of the Silhouette as a widespread form of portraiture. However, their popularity is being reborn in a new generation of people who appreciate the Silhouette as a nostalgic and unique way of capturing a loved one's image.
A silhouette is very versatile. Once you have created one, you can save it and reuse it again and again. The style has a place in history, as noted above, and is very appropriate in vintage albums. If used in the traditional black on white combination it makes a very strong statement. It can also be toned down in sepia tone or any monotone combination.
Silhouettes are fairly easy to create. You can start with any photograph of a person in profile and use the selection brush (in Photoshop Elements) to create an outline of the person(s) of interest. The key is to take your time and get a good, detailed outline. The details are what will make your person recognizable. Then create a new layer and fill the selected area with black. Then insert a new solid white layer behind it and you're done! That's all there is to it. I would recommend saving the selection so that you can use it again in the future as well as saving the file of course.
If you don't have a photo of a person in profile but you have a straight-on view that you want to use I would suggest you check out Easy Two Tone Silhouette from photoshopLab. This particular set of instructions is for Photoshop users but it works essentially the same way in PSE. It will still give you a great silhouette to use in your family history projects.
Once you have the silhouette created you can use it in all sorts of ways... on a greeting card, on a business card, as an element on a digital scrapbook page, framed as a wall portrait, as a cover design for a family history book, or even printed on a t-shirt.
Here's an example of how I took a silhouette project from my initial photograph to a completed scrapbook-page-tribute to my dad for Father's Day. The entire project took me just under 3 hours and I used a digital scrapbook kit called Remembering Father by Jeanine Baechtold (the kit that came with my June Premiere issue from ScrappersGuide.com).
Here's the photo I started with. It's a photo of my dad holding my oldest brother, 1945. We have a precious few photos of my dad so I wanted to create a silhouette eliminating the detail of my brother's face. That way I could use the silhouette in a variety of ways for any of us kids. The silhouette will show my dad's profile with enough detail to recognize him but my brother will come out as a generic baby. It could be any of us kids my dad is holding so I can use the silhouette on any piece of family artwork.
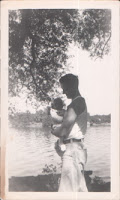
Next, I cropped the photo for a more close-up view and upped the contrast a bit so I could see the edges in the image better. As you can see, it's not an especially good photo in terms of the lighting or contrast. But that doesn't matter.
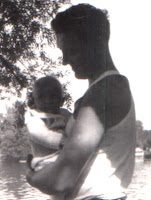
This is where I used the selection brush to create an outline of my dad and brother and fill it with black. The result is this.
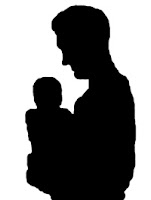
From here, I started a new file and chose a background paper to start with. Then I copied and pasted the silhouette layer from the first image to a new layer on top of the background paper. (You may have to play around with the size and scale if necessary.) Next I picked a color from the background paper and used the paint bucket to change the color of the silhouette. Then I added an outline around the silhouette to set it off from the background. From there I built the rest of the page using 3 family photos (one for each of us kids with dad) and some additional paper and elements from the kit. I finished by adding a few words that I think of when I think of my dad and I'm done. The finished piece is a 12"x12" digital scrapbook page but it could also have been a greeting card, t-shirt, or framed artwork. The photos pop out at you but the silhouette and background add a softer, nurturing, and more contemplative tone to the piece reflecting the hazy memories of dad that we share (he died 33 years ago).
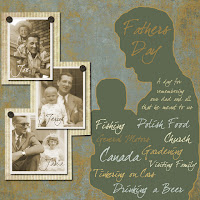 This is just one example of how you can use a silhouette of an ancestor. What other ideas do you have for using a silhouette for creative genealogy?
Did you like this post? Submit it to:


8 comments:
Great job! Are you using a mouse or a pen tablet? Your detail in the outline is amazing and the outline around the silhouette is the perfect touch.
You were adorable as a child. I love the hat!
Hey Jeanine, thanks for stopping by! I love your kit and I expect I'll be using it for many more pages.
Thanks for your compliments Denise. I'm using a mouse these days. I used to use a pen/table years ago but it wasn't compatible with Windows XP when I upgraded and I just never got around to buying a newer compatible one. So, it's just me and my mouse :-)
Scrappin' is at its best when it enhances the photos without overwhelming them. You did a beautiful job of that here. I love the idea, and the way you used it. Thanks for the tut!
Thanks T.K.! Coming from you that is high praise indeed!
Great idea! I used to hand-draw silhouettes when I was younger. Now I can do it digitally :) That's given me something to do on afree weekend :) Thanks.
That is a fantastic idea. I am big into scrapbooking in general and I have made basic family history books, but not using scrapbooking techniques. I can't wait for more ideas to integrate into my books. Thanks!
I love how you gave inspiration for its use! I submitted this to the next blog carnival!
Thanks Hummie, I'll look forward to checking out your Carnival!
Post a Comment